Master the Kettlebell Swing: A Step-by-Step Guide

The KB swing not only looks cool, but it also packs a powerful punch of strength & conditioning benefits when done correctly. Master your technique and reap the benefits of this mighty movement with this step-by-step guide.
Jack McCormick has been a coach and trainer since 2009. He’s worked in a range of settings from college sports performance to tactical S&C. Here, he provides a detailed guide on how to properly execute a perfect kettlebell swing.


Keys to a Killer Kettlebell Swing
“Those look cool and I’ve heard they’re a great workout, but I’m worried I’ll get hurt because I don’t know what I’m doing.” As a trainer and coach, this is a phrase I hear all the time, especially when it comes to kettlebell swings.
Personally, I’m fascinated by the concept of technical mastery and the pursuit of perfection as a goal, not necessarily perfection itself. The journey is the satisfying part. Few exercises offer the opportunity to constantly refine in the pursuit of perfection more than ballistic kettlebell movements, and the kettlebell swing is the foundation for all of them.
When it comes to the kettlebell swing, I know two things to be true: Done properly, kettlebell swings are a tremendous exercise requiring little equipment and are highly effective in developing power and conditioning.
When performed incorrectly though, they can be a danger, especially to your back (or to those around you if you happen to let go!). I’m here to provide the step-by-step guide I use to ensure my athletes are doing KBS safely and effectively.
KB Swing Muscles Worked
Two questions I often get from clients and athletes are “Where should I feel it?” and “What does this work?” While these questions are often used interchangeably, I believe they have different answers.
Most often, people feel kettlebell swings as a burn in their glutes and hamstrings (and also in their lungs with an increased heart rate when done for conditioning). In reality, it’s actually several muscle groups that are active in a well-executed swing.
I sometimes joke when athletes ask “What does this work?” by replying, “Well, your body!” While there is some truth to that, I recognize that the majority of people focus on their leg muscles (specifically glutes and hamstrings) when doing this movement.
It’s true that your glutes and hamstrings provide the greatest amount of power for the forceful hip extension necessary to propel the kettlebell into its arc, but we can’t forget about your quads and their role as knee extensors. Your lats and core are active here too, as they stabilize your spine, protect your back, and transfer the power generated from your lower body into the bell.
I suppose my lighthearted joke becomes a way we can enhance performance and protect ourselves when we dig deeper and realize that the swing requires the engagement of muscle groups far beyond just the hip extensors.
Step 1: The Set Up
Coach’s Tip: If your gym allows and you are comfortable with it, I recommend doing kettlebell swings barefoot or in socks. This allows your feet to “grip” the ground and better engage your legs/hips. If you’re not comfortable with this, try to do this movement in shoes with minimal support to let your feet feel connected to the ground as much as possible.
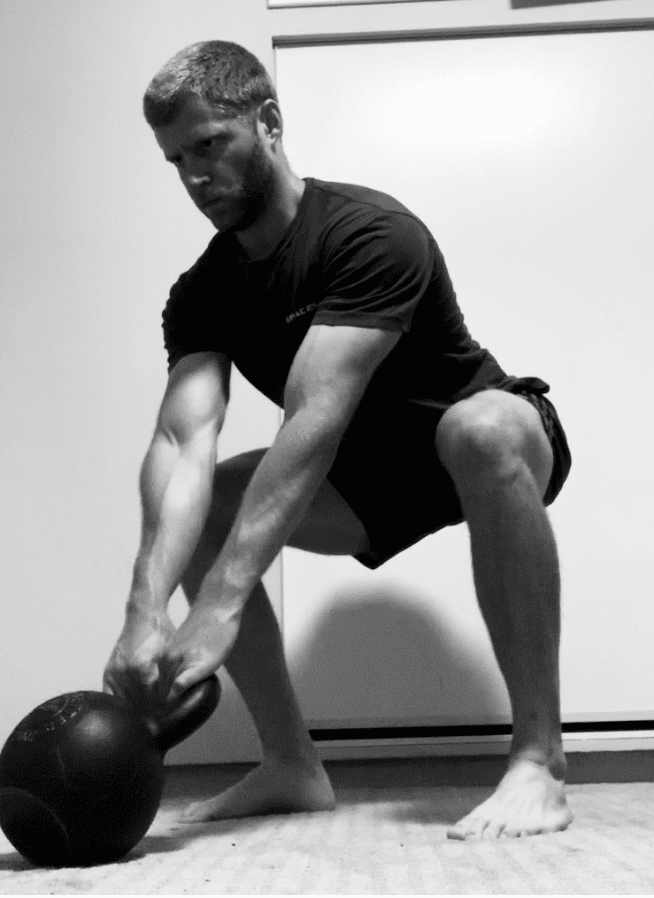
First, set the kettlebell about 12 inches in front of you — this ensures you use your lats to initiate the backswing (swinging the KB back behind you). Get into a hip hinge position with your knees bent, spine neutral, and chest up. This puts you in the ideal position to create tension in your glutes and hamstrings to initiate a rapid hip extension.
At the bottom of your hinge position, your feet can be slightly wider than shoulder-width apart and your toes slightly angled out. Align your knees so they are tracking over the direction of the middle of your toes. A simple tip to do this is to “grip” the ground with your feet and imagine you’re trying to “split the floor open” or that your feet are like small tripods.
Reach for the bell handle while you’re hinging and tilt the bell back toward you while gripping the handle with both hands. By tilting the kettlebell, you’re shifting your body weight back slightly and actively loading your glutes and hamstrings. This counterbalances the kettlebell being in front of you. It also helps you load the right musculature for the movement and protect your low back.
From here, think about activating your lats to help further stabilize your spine in a neutral position. The best way to do this is to pretend that you have $20 bills in your armpits that you don’t want to lose. Squeeze those armpits!
At this bottom position, similar to the bottom position of a proper deadlift, you are:
1. In your hinge with the kettlebell slightly in front of you
2. Tracking you knees out over our toes
3. Actively loading you glutes, hamstrings, and lats
4. Extending your neck slightly
Take a sharp, short breath in and keep your abdominals engaged as if you have a “coat of armor” on your torso. Your quality setup position should like something like this:

You Work too Hard to Not See Progress
Find Your Perfect Training Plan
Options for Every Goal
Training plans from real coaches covering any goal, fitness level, and number of sessions per week.
The Best Coaches
Get coached by the best. Olympians, ex-NFL stars, Titan Games Winners, Sport Scientists and more.
Starting at $1/ day
With many options including a free 7 day trial, you can try out programming before you commit.
Step 2: The Backswing
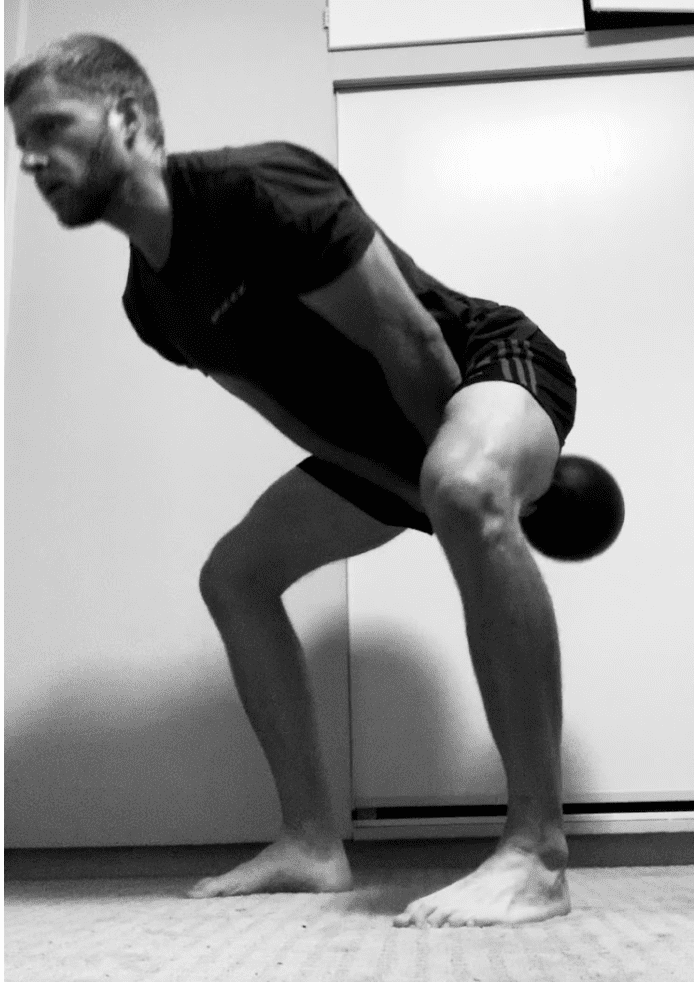
This next step is properly executing a back swing. You can also think of this as “hiking” the kettlebell in the same way a center hikes a football at the snap.
I first teach clients to just hike the kettlebell back and then return to the start position. We practice this for several reps so they understand how to use their lats (not the low back) to drive this portion of the movement. It looks almost as if the bell is a pendulum, going from the start position to back between your legs, then back to the start position. Do this all while keeping tension in your hinge.
You should feel as though you can comfortably hike the kettlebell from the start position and back into the hinge while staying low and not losing tension before you get into the dead-stop swing. Practice this and see if you can keep tension in those areas and really own that hinge position at the beginning of the movement.

Step 3: The Dead-stop Swing
After the backswing through your legs, drive your feet into the ground like you’re trying to push the floor away. Squeeze your glutes to pull your hips forward. This drives the kettlebell forward out of your hinge position and into its arc of movement. Think about using the same hip power you’d need if you were about to jump as high as you can.
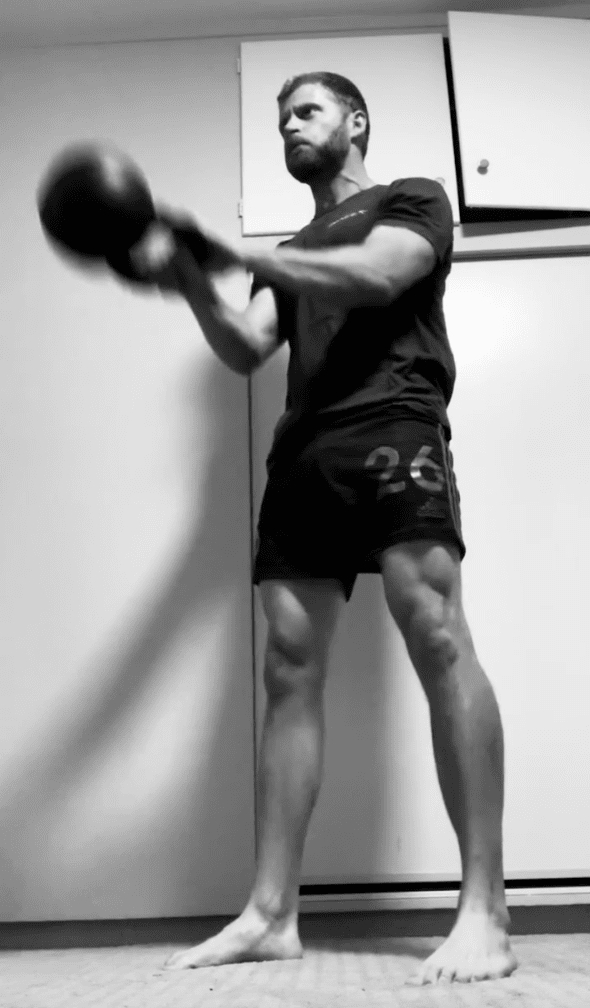

This next part is especially key: as you drive the movement with your legs, think about actively squeezing your quads to help finish the extension of your legs. Use a sharp exhalation of your breath as you finish the aggressive extension of your legs and hips, which gives added power to the movement. Think of trying to blow out birthday candles through a straw. This exhale also keeps your abdominals engaged and assists in the protection of your low back.
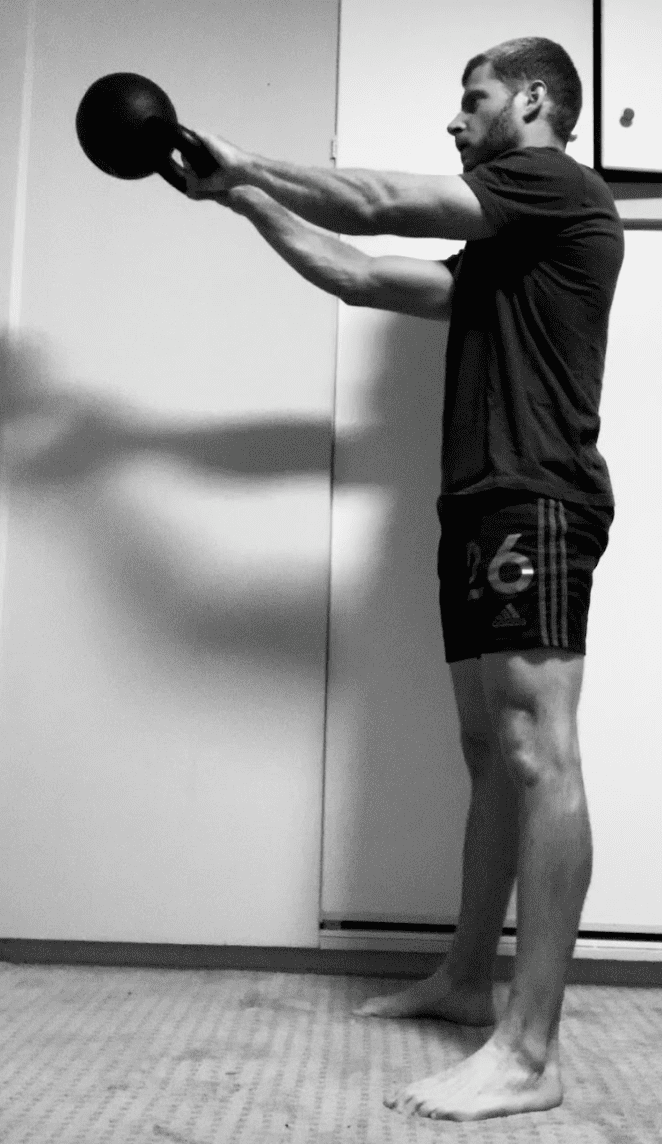
After the kettlebell passes through your legs and you reach full extension, think of yourself as being in a vertical plank position. Keep your knees and hips extended, spine neutral, and try to be tall. Your quads, hamstrings, glutes, abdominals, and lats (not your arms!) are all actively engaged as you guide the kettlebell with your hands and allow it to “float” to about chest height.
Coach’s Tip: Beginners can keep the height of the kettlebell around chest level. In more advanced KBS variations, the bell continues to move up until it’s directly overhead with your biceps beside your ears. The beginner swing is sometimes called a Russian KBS, while this more advanced swing is sometimes called an American KBS.

This ensures that you’re using the correct hinge mechanics to set you up for a proper swing. It also limits the chances of you “squatting” the movement back up or using your low back to drive the movement. These two common flaws reduce the KBS effectiveness and can result in injury.
After getting back into your hinge from the backswing, allow the kettlebell to gently come back forward. Park the bell back in front of you in the same position you started.
I recommend doing five or so reps of the dead-stop swing to keep your movement quality high and avoid fatigue as you iron out this new movement.
Level Up Your Training
With TrainHeroic’s immersive training app
TrainHeroic does everything you wish your old gym notebook could do.
Take the guesswork out of training with built-in exercise instruction and basic training programs. Compete against yourself and others. Track your performance and readiness. Smash your goals.


Step 4: Linking Swings Together
Take a breath to brace your core as you get back into your hinge. Remember to use the same sharp exhalation to blow out those birthday candles as you finish each hip extension.
The set is only finished after you’re back into your starting hinge position after the final rep, using one final backswing to gently guide the kettlebell back to the start.
Risks and Good-to-Knows
So, there you have it! Now you know the basics of how to properly set up and execute a kettlebell swing, but I’d like to add a few more things before I send you on your way.
First, if possible, have a qualified trainer watch your technique and go over the movement with you in person. Kettlebell swings are a great exercise, but if you’re not locked in with your technique, you might be risking injury. It never hurts to ask a coach.
Next, be aware of your surroundings. Never do kettlebell swings with any objects (or people!) immediately in front of or behind you. I have known situations where a person has lost their grip on a kettlebell while doing swings and it launched forward and broke a table. Better a table than a person, but the point remains: make sure you have a safe zone of space where an errant kettlebell won’t do any damage.
Finally, if you have any sort of injury history that may be exacerbated by a kettlebell swing, make sure you are cleared by a qualified medical professional, then go back to point number one: have a trainer help you through it.
A Note On Variations & Programming
Now that you’re proficient in the swing and can do it safely, the fun and creativity can begin!
You can use kettlebell swings for power with heavier weight, but keeping reps low in the 3-8 range. Or you can do them for conditioning with lower weight and higher rep ranges of 10-15.
The mechanics of the two-arm kettlebell swing are the foundation for the one-arm swing, the KB clean and the KB snatch. There are a ton of different variations and other ways to enjoy such a simple yet complex movement, but having a solid foundation with the KBS first is so important.
The kettlebell swing is a killer exercise if you’re looking for a new way to develop power, improve your fitness, or if you’ve ever looked at that rack of bowling balls with handles on them and wondered, “How do I use those?”
Disclaimer: The views and opinions expressed in this article are my own and not those of my employer. This article was written on my own personal computer and not as part of any work done for my employer.
Want Training Tips, Exercise Guides & Knowledge Bombs Sent to Your Inbox?
Sign up for the FitNerd newsletter from TrainHeroic
Related articles
Branding for Strength Coaches Part 3: Selling Your Programs
So, you’ve chosen your niche, set up your TrainHeroic profile and established your coaching brand — now it’s time to get those programs in front of the right athletes. Whether you’re launching your first program or looking to boost sales for existing ones, this guide...
TrainHeroic’s Top Online Bodybuilding & Physique Programs
You’ve had that vague dream in the back of your mind of competing in fitness, figure, physique or bodybuilding, but never a plan to make it on stage. You train hard, eat well, and suffer through cardio, but there’s something missing from your routine. Or maybe you’re...
Branding for Strength Coaches Part 2: Getting Started in the TrainHeroic Marketplace
When it comes to selling your programs as a strength coach, standing out is key. A well-crafted profile on the TrainHeroic marketplace not only helps potential clients find you but also establishes trust and shows off your uniqueness. In Part 1 of this series, we...


Join the community
Sign up for the latest training news and updates from TrainHeroic


About TrainHeroic
Made with love, sweat, protein isolate and hard work in Denver, CO
© 2023 TrainHeroic, Inc. All rights reserved.


